
Blue-Green Deployments: A Practical Guide for Zero-Downtime Updates
Outlining the implementation of a blue-green deployment setup, this post focuses on web applications that have outgrown their early stages and require a strategy to minimize interruptions, especially during the deployment of new app versions.
Starting Point
When starting to build the app, I had plenty of options to choose from for hosting it in production. Knowing it would take some time to build the initial prototype and to seek product/market fit, and being in a legally restricted and privacy-sensitive domain, I opted for Hetzner Cloud early on as they allow operation under full GDPR compliance.
I rented a single virtual machine to run everything in production: web app, backend app, database – everything was glued together with Docker Compose and running on that machine for less than 5 EUR a month.
That worked for the first set of customers who were, to a certain degree, tolerant of failures and outages. But as the usage of the application grew, so did my concerns about this very simple setup.
The Goals
While everything was running reliably and stably, I was primarily concerned about downtimes caused by deployments, bugs in new versions of the application, or the occasional necessary reboot.
Before developing the concept for the next iteration of our hosting setup, I started out by defining some goals that needed to be met.
Goal 1: Zero-Downtime Deployments
No matter how few errors new versions of the app include, there is always a chance they might interrupt some ongoing operations when being deployed. Because of Docker works, whenever a new Docker image is deployed, the old image must be stopped, and the new one started up. This process might only take a few seconds, but during that time, the app is essentially broken from the user’s perspective.
Goal 2: Minimal Downtimes for Maintenance Reasons
Sometimes, downtimes are inevitable. For instance, updated system packages occasionally require a reboot. Or, some components critical to the runtime, such as Docker itself or a database server, need to be updated. It should be possible to perform as much of these tasks with as few interruptions to the production system as possible.
Goal 3: Having a Staging Environment
Successfully running something on a local development machine is one thing; having it run in production can sometimes reveal errors that were previously overlooked. Therefore, having an environment that closely mirrors production, but isn’t production (yet), could significantly aid in rolling out updates.
Goal 4: Being able to roll back to another Version
Mistakes happen, despite being careful and testing thoroughly. So it would be convenient to be able to go back to a certain version of the application when needed.
Goal 5: Having a nice Web-based Interface
While deploying through a command-line interface is a good first step, the ability to deploy (or roll back) from a web browser would be even more convenient.
The Basic Idea
The idea behind blue-green deployment is simple and not new: You essentially have two servers provisioned in the same way, each capable of handling all the traffic, completely independent from the other. However, only one is active at any given time, while the other stands by.
The Implementation
Step 1: Conceptually Decoupling the existing Monolithic Deployment

Aside from some "sidekicks," the app has historically run on three different Docker containers built from a shared code base: the web frontend, the backend (essentially an application that serves a REST API), and the database.
Separating the web frontend and backend wouldn't provide much value at this point. In fact, it's quite the opposite: Having them in a single code repository simplifies management, especially during development. Therefore, it's an acceptable trade-off to have both the backend and the frontend container running on both blue and green setups in the future.
The database, however, is a different story. Having two separate databases does not make sense in a scenario where swapping one environment for the other must be possible. Thus, the database must be hosted on its own server, running independently from blue and green.
Step 2: Setting up the Web Servers and the Database Server
Now that we have a preliminary layout of our new setup, it's time to make that plan a reality. Two web servers, blue and green, need to be set up, identical in their configuration. Additionally, a third server will host the database to which both blue and green connect.
It makes sense to keep both servers independently accessible, so when mapping the domain foo.bar to both of them, we can also make them reachable through blue.foo.bar and green.foo.bar, respectively.
Step 3: Putting a Router in front of it
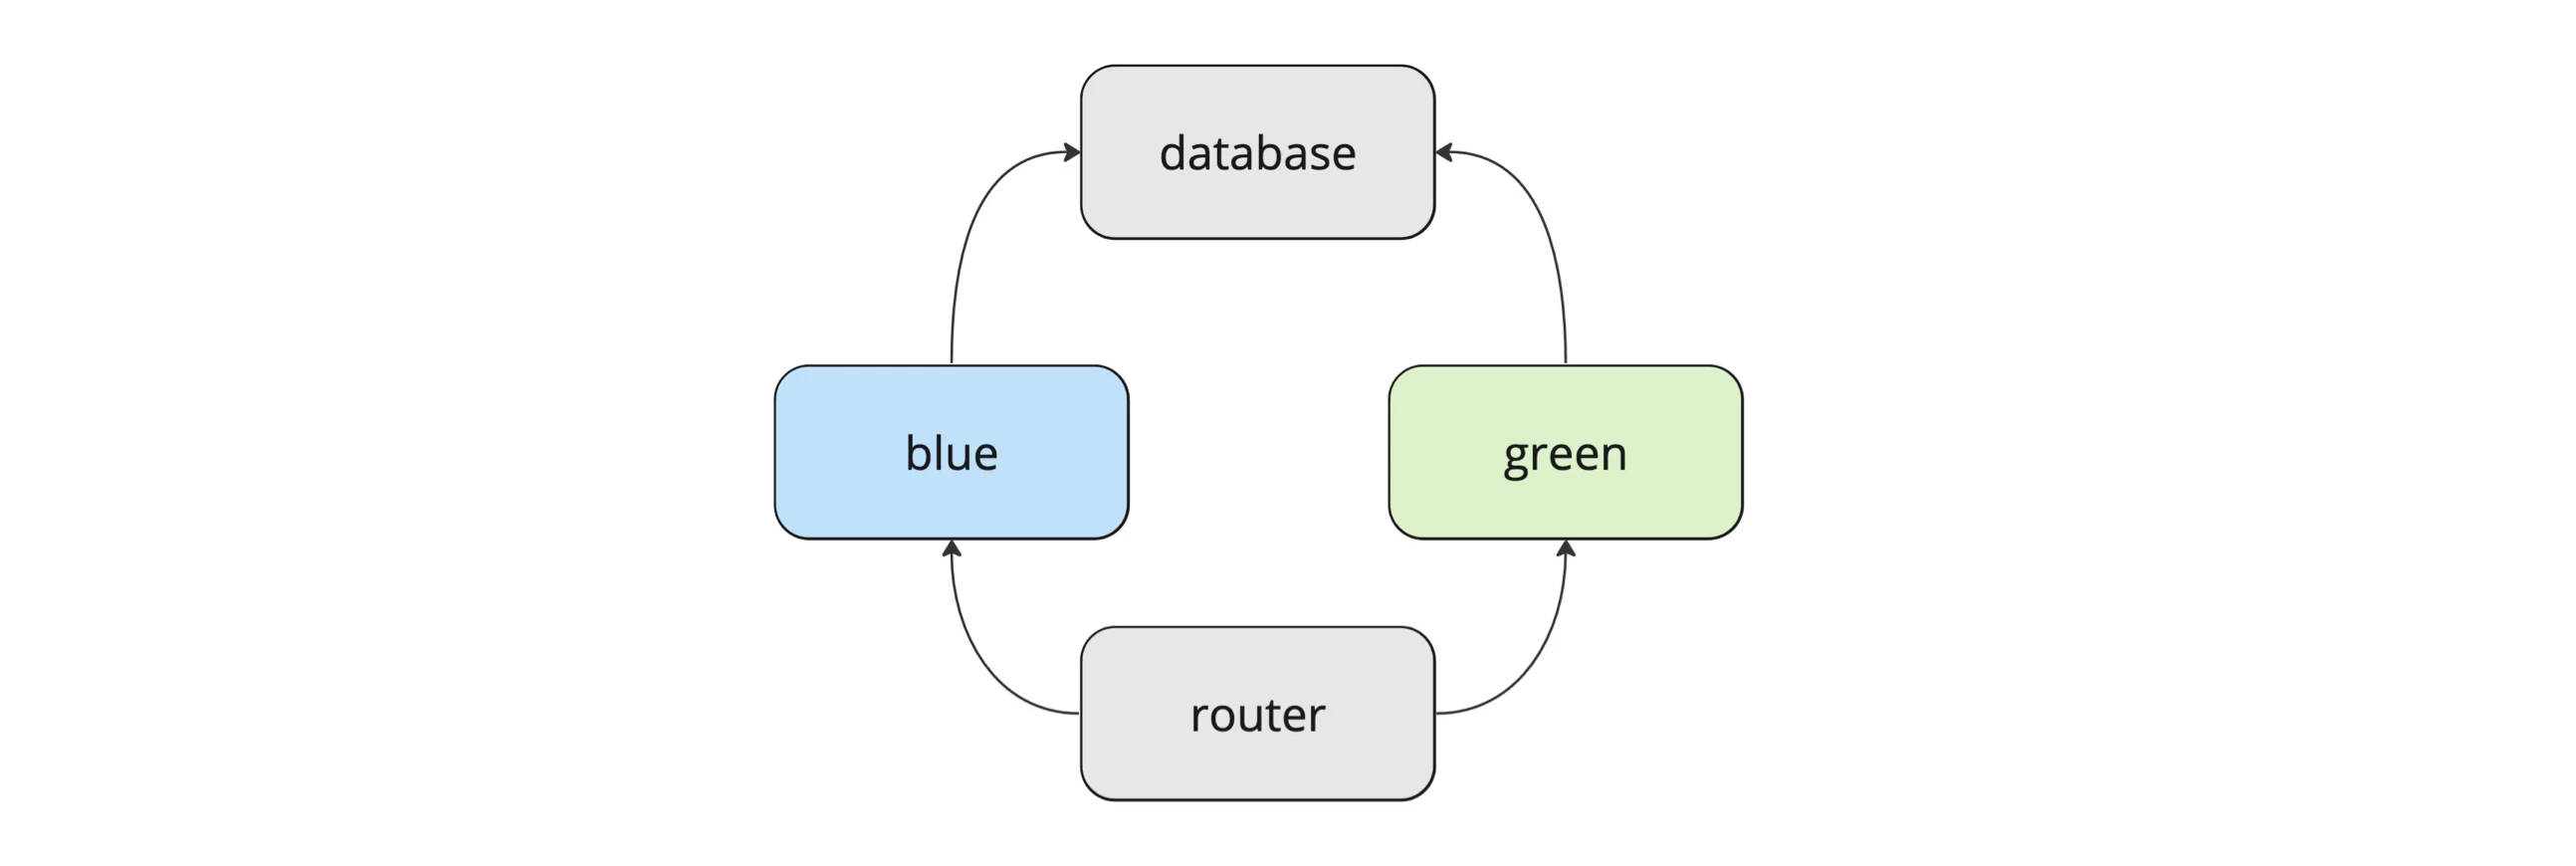
If either blue or green should be "the one," and it should be possible to switch between the two instantly without the users (or any client application) noticing, we need another resource to help us out here: the router.
So, for any request made to our router, it will be decided whether it is handled by either blue or green. The decision will be made based on the current configuration.
While blue.foo.bar is mapped to the IP address of blue and green.foo.bar is mapped to the IP address of green, foo.bar will be mapped to the IP address of the router.
Tip: Alternatively, you can also use a so-called Floating IP Address offered by Hetzner. Floating IP addresses can be reassigned on-the-fly to any suitable server. This way, if you have to maintain, upgrade, or replace the router server later on, you can always temporarily map the IP directly to blue or green and bypass the router. This might give you a bit of extra peace of mind.
Step 4: Tagging Docker Images
Keeping in mind that one of the goals is to deploy through a web interface, it must be possible to select a specific version of the app before deploying it. To do so, add a unique tag to each Docker image before pushing it to your container registry.
Step 5: Scripting Deployment and Routing
To provide a web interface, we need a way to programmatically deploy a certain version of our app onto blue or green, and to configure where to send the traffic that goes through our router.
On blue and green, we add a script that basically executes docker-compose up -d in the context of a certain tag. On the router server, we add a script that reconfigures the internal target (either blue or green) and reloads the reverse proxy server we are using.
On all three servers, we bind the respective script to an SSH key available to the user account running the Docker daemon:
command="/script.sh" ssh-rsa ...
This way, the script can be executed by the controller, which we will introduce in the next step. In case that controller is compromised and the private SSH keys are disclosed, all an attacker can do with them is execute those scripts. While this may still be problematic, constructing it in a way where some "full login" would occur would pose an even greater risk.
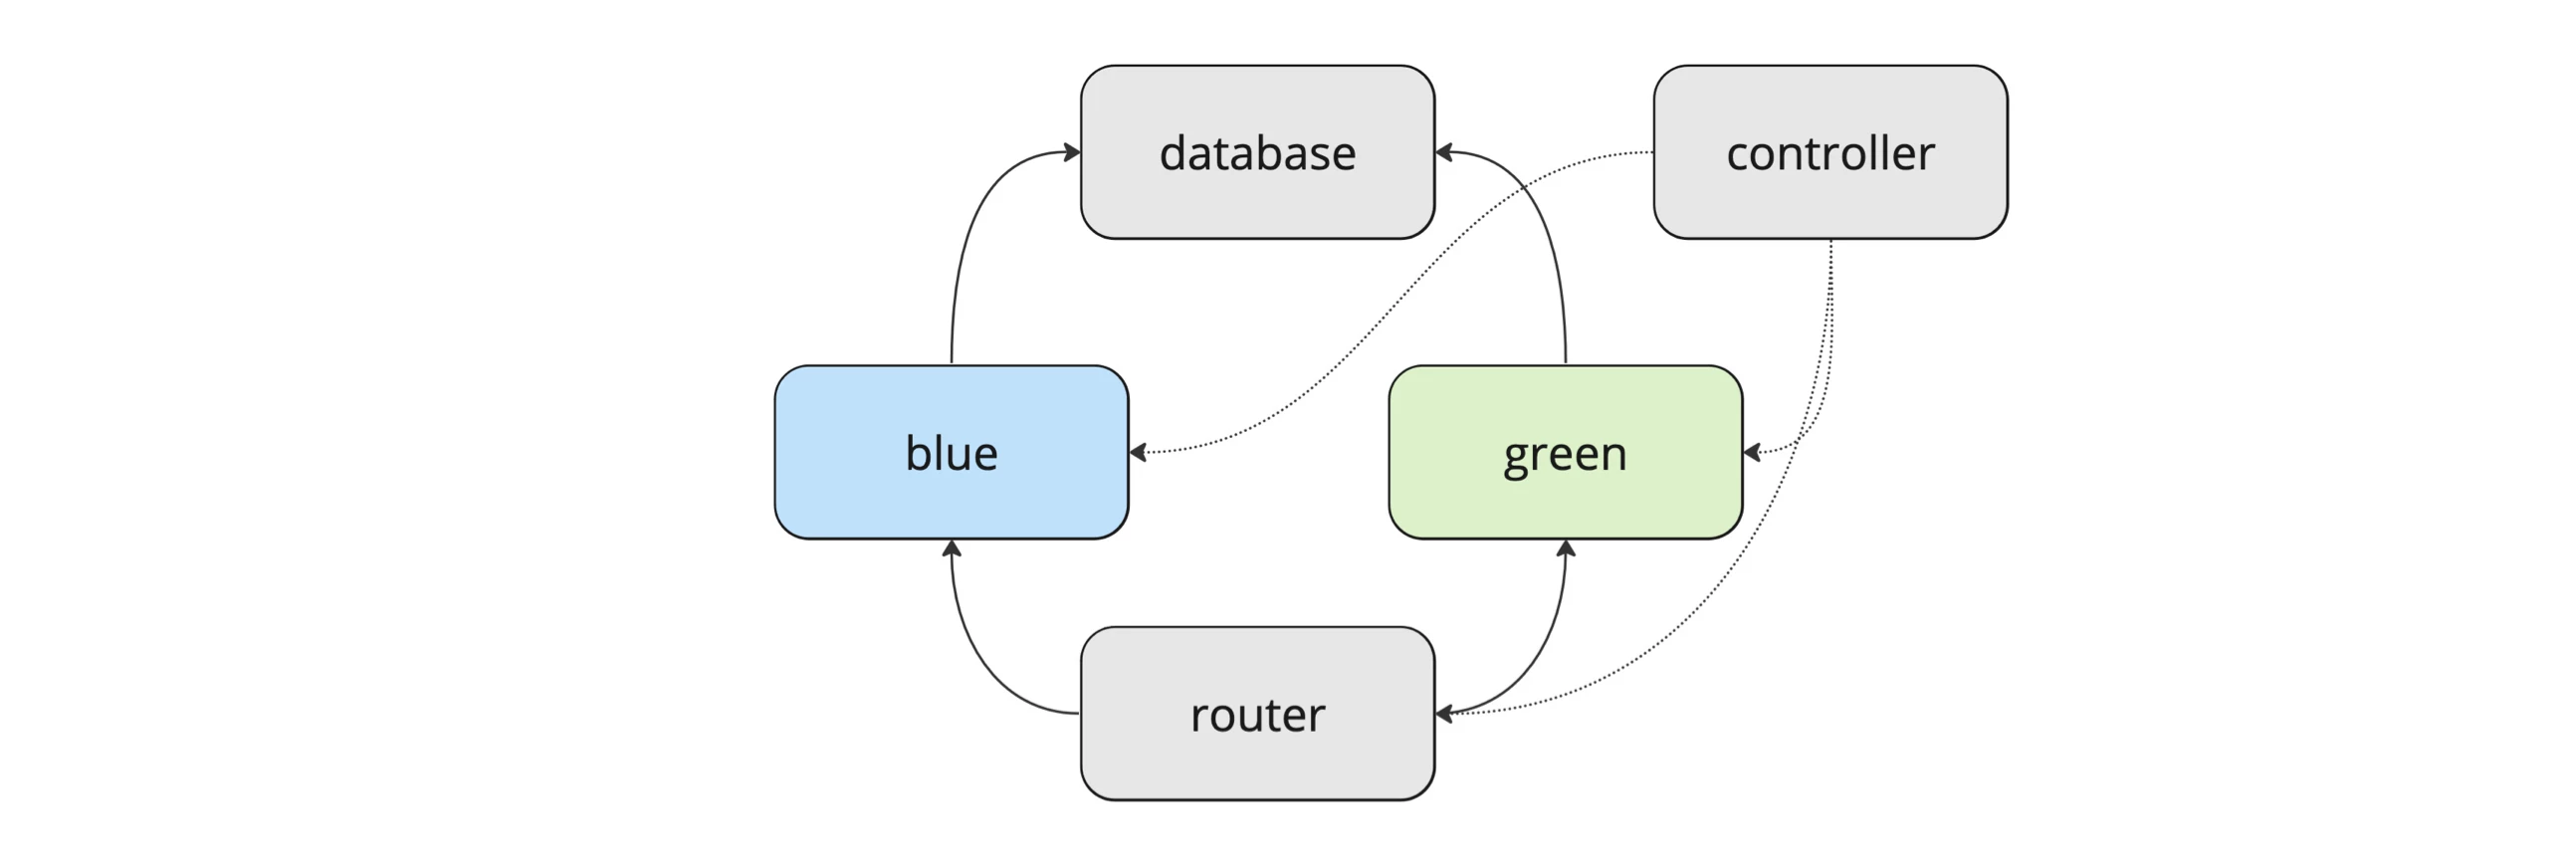
Step 6: Adding the controller
Now, we need something to run those scripts via SSH, or put differently: "to control" what is deployed where and which environment is currently active. We call this a controller. The controller is essentially a simple web application that should be run on its own server, independent from the others.
To deploy a specific app version, you first need to fetch all available tags from the container registry and let the authenticated user select a specific tag to run the remote script with the click of a button.
Similarly, switching between blue and green as the active environment can happen through a button click as well. A click that triggers the establishment of an SSH connection between the controller and the router and the execution of the script on the router.
Evaluation
Let's see if this implementation fulfills all of the previously defined goals.
Goal 1: Zero-Downtime Deployments
Let's say blue is currently running our images with the tag A in production, which means that A is deployed on blue and the router is directing all traffic to it. We can now select tag B and deploy the images with that tag to green. Once that has been successful, we can then flip the active environment, so all the traffic would now be sent to green instead of blue. Given the implementation of the router allows for the update of the configuration of the reverse proxy on the fly, this provides a deployment with absolutely no downtime.
Goal 2: Minimal Downtimes for Maintenance Reasons
As we still have our database in the backend running on a single server, we cannot fully avoid downtimes when taking that database server offline, e.g., through a reboot. However, we still minimize the necessary downtimes in the big picture:
- We can run the same version of the application on both blue and green and always take one of the two offline without interrupting the service.
- When using a Floating IP address as suggested, it is also possible to temporarily take down the router and bypass it by directing all the traffic directly to either blue or green.
- The controller being offline doesn’t affect the service in production.
Goal 3: Having a Staging Environment
Before flipping the active environment as shown above, we can always test the non-active environment through the respective domain or IP address.
Goal 4: Being able to roll back to another Version
Nothing prevents us from running an older version (tag) of the application. So, it is absolutely possible to roll back changes.
Goal 5: Having a nice Web-based Interface
Whether it’s nice or not will depend on your design skills, but at least we have a functional controller web application in place!
Summary
As promised, this article has outlined the setup of a fully functional blue-green deployment.
Of course, a lot of details, both small and large, were not mentioned. For instance, hardening the servers from a security perspective and developing and implementing a proper backup strategy are critical considerations. Having a standby PostgreSQL instance is valuable, but it is not a backup. If the data center burns down, there is a high chance that all data will be lost.
Implementing a proper blue-green setup requires considerable effort and is not a universal solution. For those just starting out, I recommend renting a single server for a few bucks a month from providers like Hetzner, Digital Ocean, or similar. Even the cheapest options are usually sufficient to run a web app along with a database and serve the first users. And if you need to scale to the moon, well, you certainly want to solve that differently, too ;-).
Addendum 1: Limitations
Database Migrations
With a single shared database, there might be compatibility issues with the current schema between green or blue. Automating schema updates adds enormous complexity in a deployment setup like blue-green, so handling these updates carefully and manually is advisable. Similar to REST APIs used by clients that cannot be updated immediately (e.g., mobile apps), the database schema could remain backwards compatible up to a certain point.
State(less)
Ideally, your app is fully stateless and can be switched between blue and green without issues.
However, in real-world scenarios, you might encounter problems with things like cookies, server-side sessions, and other elements bound to a single instance or requiring shared information (e.g., through a database or shared file system).
For example, my application was running some tasks in the background that regularly perform things like sending notifications to users. At one point, I faced a support ticket reporting that all notifications were suddenly coming in twice... It took me a few minutes to realize that blue and green were both processing sending jobs from the shared database simultaneously.
Be careful and realistic about your app's requirements!
Addendum 2: Discarded Considerations
Keeping everything running on a Single Server
Technically, it's possible to run the same Docker image multiple times on the same server, making a blue-green scenario feasible even within a single Docker Compose setup. Adding a reverse proxy in front of the blue and green services, and you're set.
This might be the simplest version of such a setup and not a bad one, as it would be the most resource-efficient in terms of both hardware resources (and thus energy consumption) and money. However, having to upgrade a single component or performing a required reboot would bring the whole application down, even with a certain risk of not getting it back up again.
So, I decided to use at least two different virtual machines for blue and green, not just different Docker services on the same server.
Using the Hetzner Load Balancer and the Hetzner API
Using a load balancer to route traffic between blue and green is not its intended purpose. However, it can be used for this. But to leverage it, it needs to be automated and scripted, so everything can be triggered through the web interface.
This is where the Hetzner API comes into play, allowing management of any Hetzner resource. But there's a significant limitation: As of writing this article, the API only allows operation in a read-only or write mode. Configuring the load balancer through the API requires an auth token with write permissions. And with the right to write comes the right to delete, meaning if that token falls into the wrong hands, it could be used to wipe every single resource within the Hetzner project it was created for. Way too risky, in my opinion.
Implementing Automatic Fail-over for the Database
The database remains the single point of failure in the outlined setup. If the database goes down, so do blue and green. However, having automatic failover for a database comes with a hefty price tag, sometimes literally in real money, almost always in terms of complexity. So, think twice before going down that rabbit hole. If you run a database on, e.g., PostgreSQL, starting with setting up streaming replication on a "cold" standby server and then switching manually if ever needed might be a good idea.
What do you think? Drop me a line and let me know!